
Imagine checking your WooCommerce dashboard on a Tuesday morning and seeing a major spike in revenue. Your first instinct is to celebrate. Your second instinct is to ask: Where did these buyers come from? Was it the email newsletter you sent out yesterday? The Instagram Story you posted last night? Or did a niche blogger link to your product page out of the blue?
Without accurate tracking, your store’s traffic is a black box. You see the numbers on the screen, but you cannot connect the dots between your marketing efforts and actual sales.
This is where UTM parameters come in. They are simple, invisible tags you add to the end of your links. When someone clicks a tagged link, they carry that tracking data straight into your analytics dashboard, showing you exactly which marketing campaign drove the purchase.
The Anatomy of a UTM Link
UTM stands for Urchin Tracking Module (named after the analytics software that Google bought back in 2005 to create Google Analytics). While the name sounds deeply technical, a UTM parameter is just a bit of extra text tacked onto a standard web address.
A normal link looks like this:https://yourstore.com/product/leather-boots/
A link with UTM parameters looks like this:https://yourstore.com/product/leather-boots/?utm_source=newsletter&utm_medium=email&utm_campaign=summer_sale_2026
The text after the question mark does not change where the page goes. The customer still lands on the leather boots page. But everything after that question mark acts as a digital passport, feeding specific data to your tracking tools.
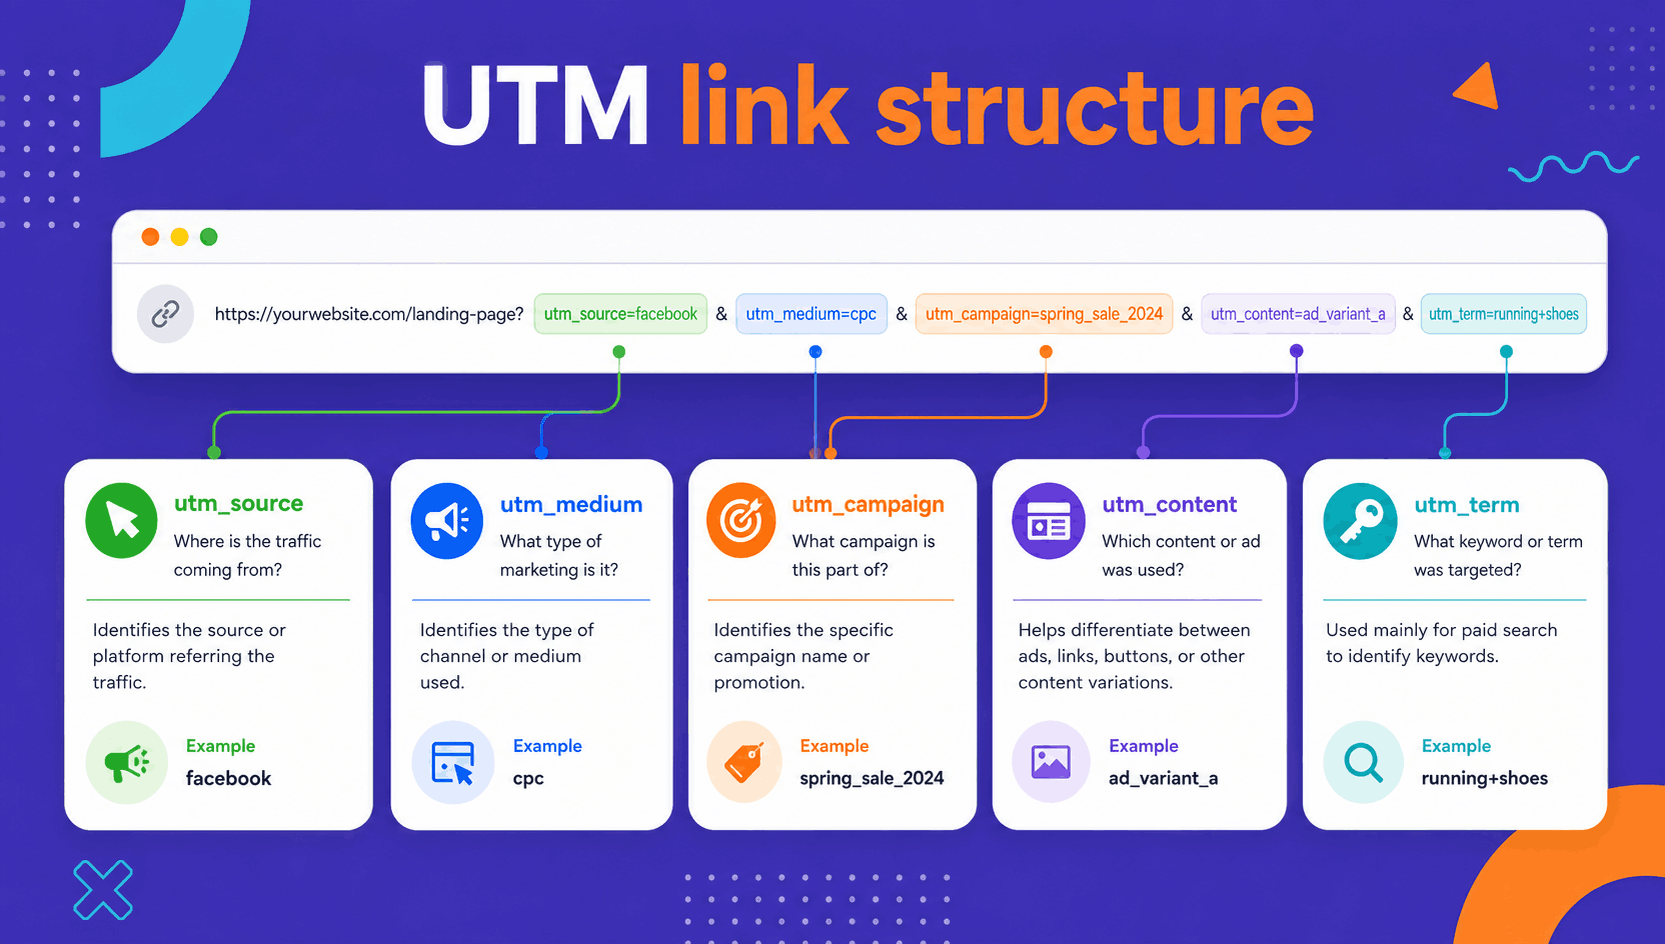
There are five standard UTM parameters you can use to map out your traffic.
The 5 Core UTM Parameters
| Parameter | What It Tracks | Example Values |
|---|---|---|
utm_source | The specific platform or site sending the traffic. | instagram, newsletter, google, facebook |
utm_medium | The broader marketing channel or vehicle. | email, cpc (paid ads), social, affiliate |
utm_campaign | The overarching promotional effort or launch. | summer_sale, black_friday, abandoned_cart |
utm_term | Used mostly for paid search ads to track keywords. | handmade_shoes, waterproof_boots |
utm_content | Distinguishes different links within the same campaign. | top_banner_button, footer_text_link |
Seeing It in Action: A Real-World E-commerce Example
Let’s say you are running a 20% off Summer Kickoff Sale for your WooCommerce store. You plan to promote your main category page across three channels: an email newsletter, a paid Facebook ad, and an Instagram bio link.
Instead of sending everyone to the same raw URL, you create three distinct links:
- For your Email Newsletter:
https://yourstore.com/shop/?utm_source=mailchimp&utm_medium=email&utm_campaign=summer_kickoff_2026 - For your Paid Facebook Ad:
https://yourstore.com/shop/?utm_source=facebook&utm_medium=cpc&utm_campaign=summer_kickoff_2026 - For your Instagram Bio Link:
https://yourstore.com/shop/?utm_source=instagram&utm_medium=social&utm_campaign=summer_kickoff_2026
When a shopper clicks the email link and buys a pair of shoes, Google Analytics reads the incoming URL. It registers that the purchase belongs to the summer_kickoff_2026 campaign, driven specifically by mailchimp via email.
At the end of the week, you can compare all three links to see exactly which channel brought in the highest average order value and the best return on investment.
How to Read Your UTM Data in WooCommerce
Google Analytics is excellent for understanding traffic, but it lives outside your store and reports on sessions rather than individual orders. If you want to connect a UTM tag directly to a real sale—and see it next to the customer, the products, and the revenue—the fastest way is a dedicated plugin like UTM Tracking for WooCommerce. It captures the UTM parameters of every visitor and attaches them to the order the moment they buy, so attribution happens inside WordPress with no extra reporting setup.
Once the plugin is running, here is how to read your campaign data:
- Install and activate UTM Tracking for WooCommerce. It starts recording the UTM parameters of incoming traffic right away.
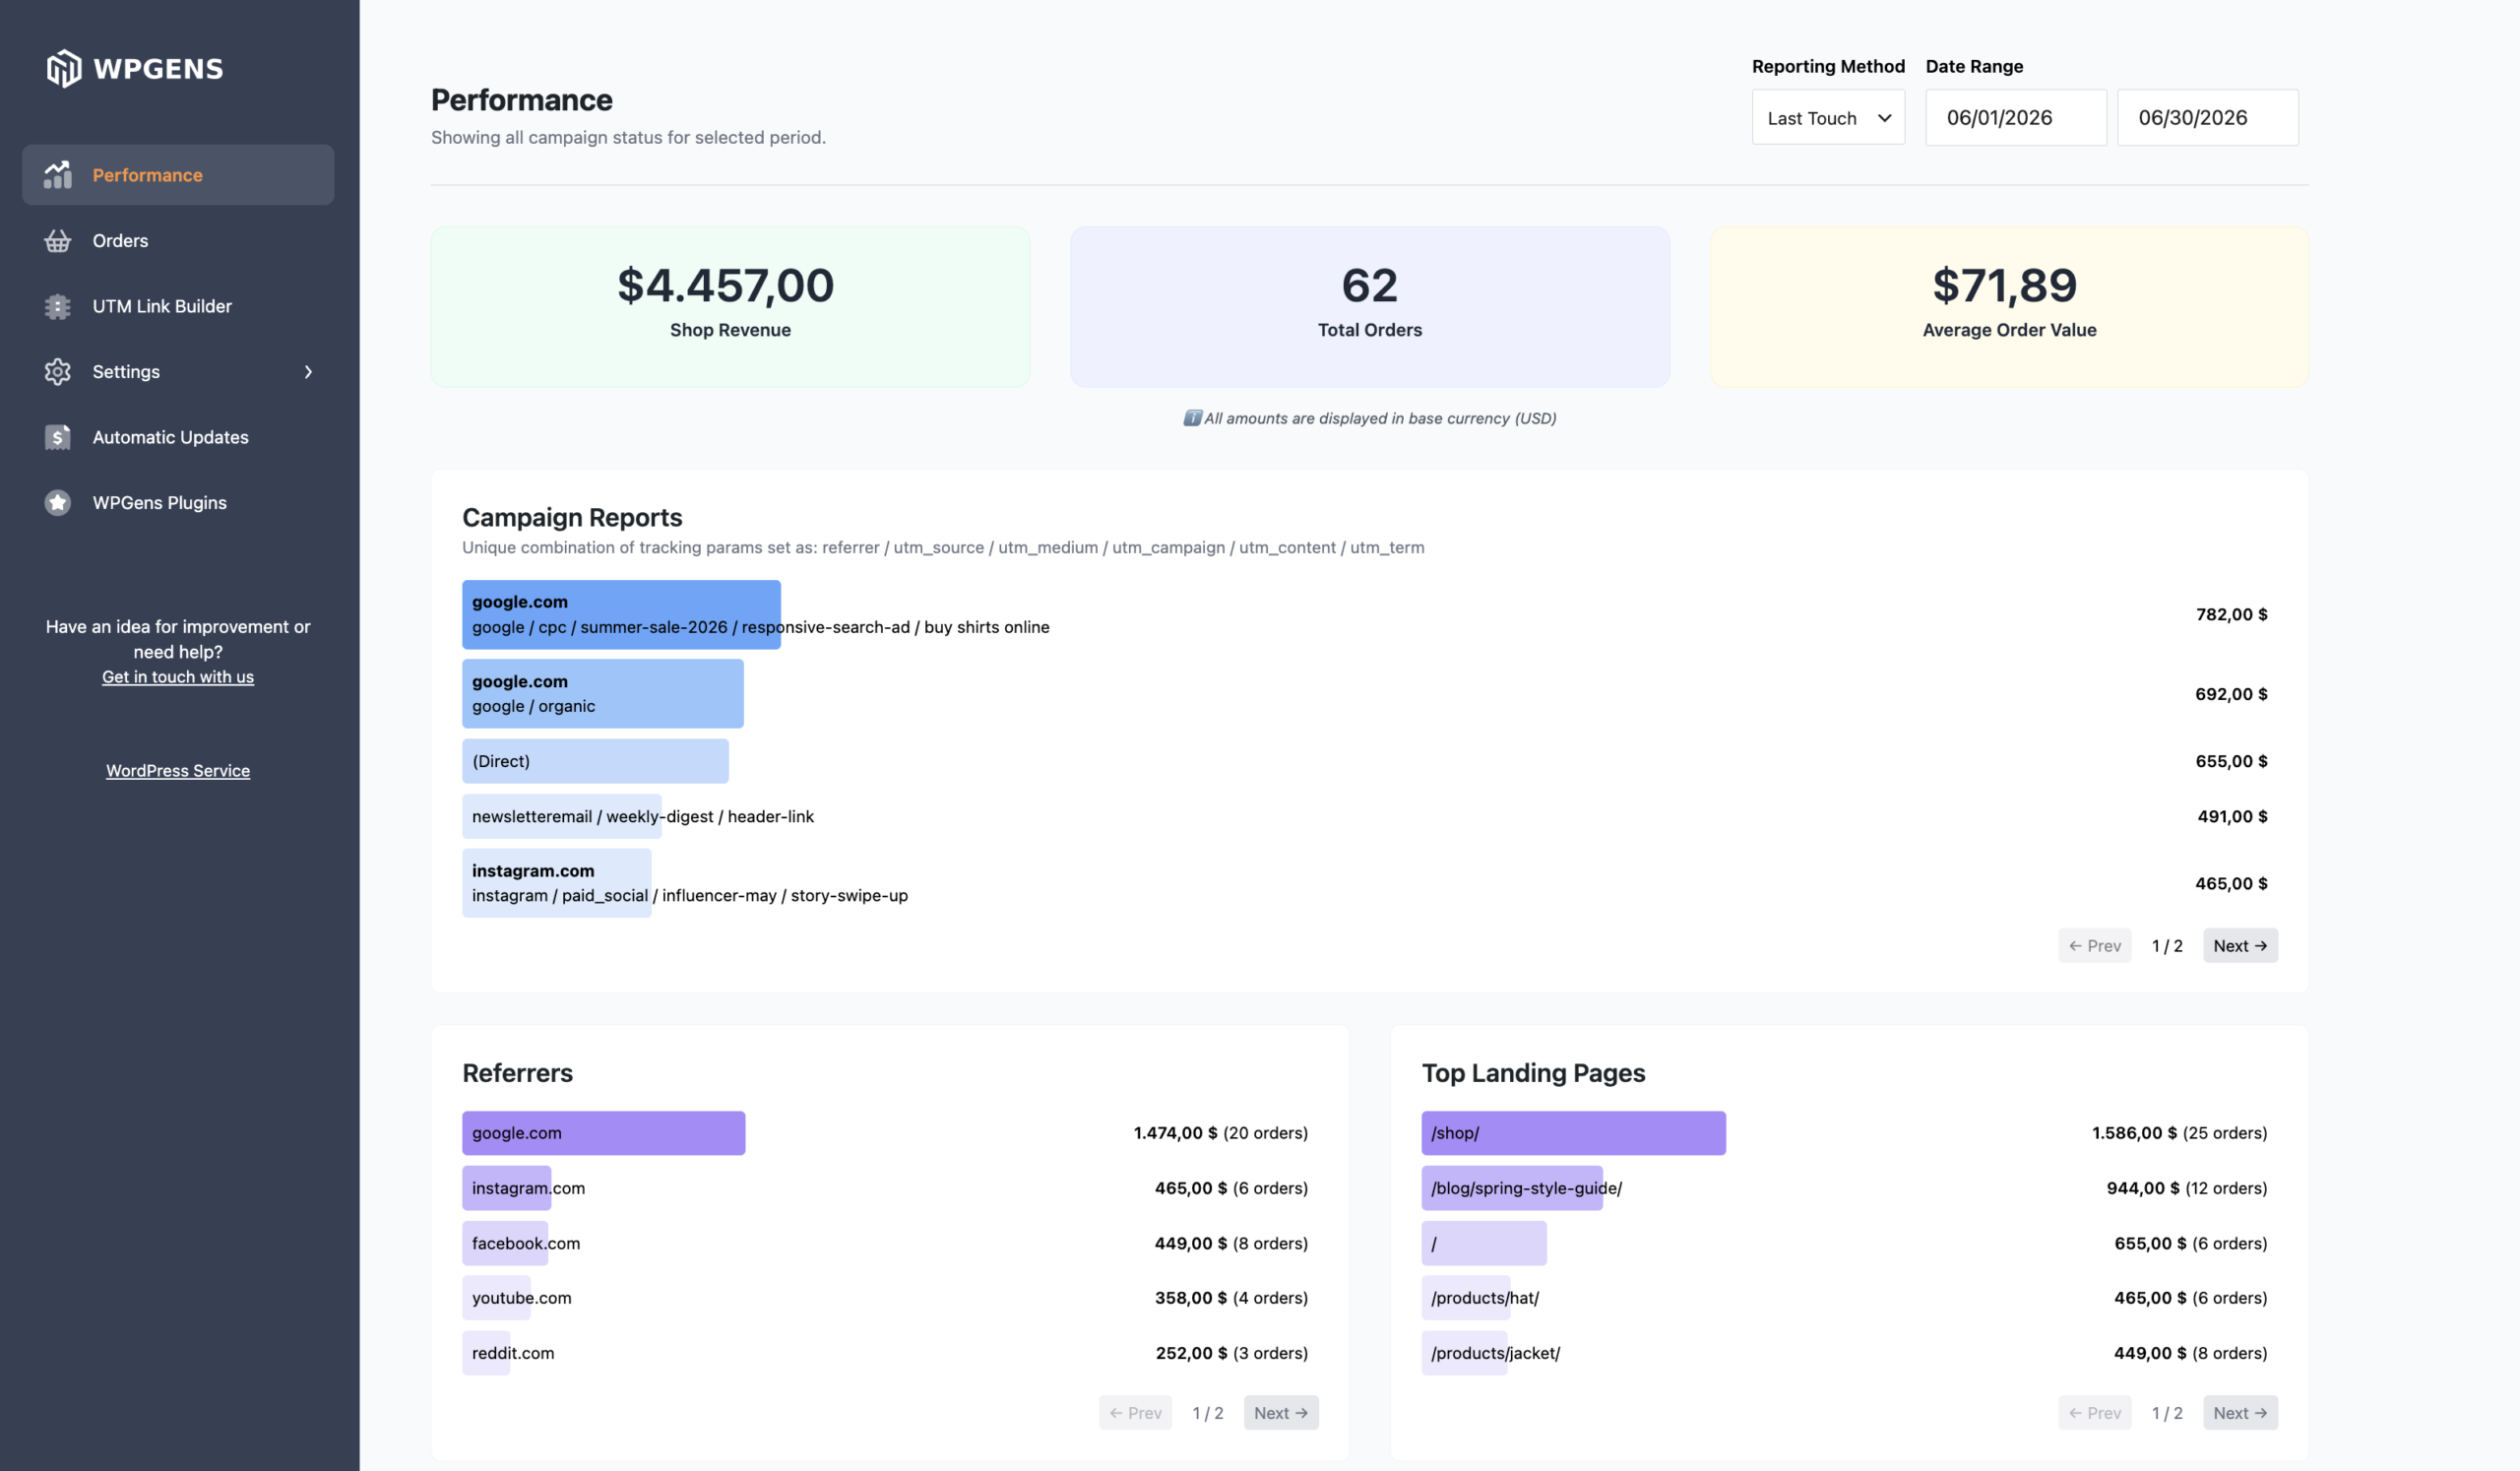
- In your WordPress dashboard, go to WooCommerce > Marketing > UTM Tracker to open the reporting screen.
- Review the dashboard, where sales are grouped by source, medium, and campaign, each with its own total revenue and order count.
- Apply filters to narrow the report by any UTM parameter (source, medium, campaign, term, or content) and a custom date range, so you can compare campaigns side by side.
- Switch between First Touch and Last Touch attribution to see whether a channel introduced the customer or closed the sale.
For order-level detail, open any individual order. The plugin adds an Order Source panel showing the first- and last-touch parameters, the landing page the customer arrived on, and the conversion lag (how long it took from their first visit to the purchase). A Source column in the main Orders list also lets you scan attribution at a glance without opening each order.
Unlike a standalone analytics tool, this data sits right beside your orders and ties every UTM tag to actual revenue—making it easy to prove which campaigns truly pay off.
How to Read Your UTM Data in Google Analytics 4 (GA4)
If you do not want to invest in a dedicated plugin, Google Analytics 4 gives you a free view of your campaign traffic, and the UTM links you build flow into it automatically with no extra configuration. However, the key difference is that GA4 does not provide a dashboard which lets you see your campaign performance, top referrers, and top landing pages at a glance. Instead, you need to add these dimensions to reports yourself.
For example, to see your campaign performance:
- Log into your Google Analytics 4 dashboard.
- Navigate to Reports > Acquisition > Traffic acquisition.
- Look at the primary dimension column (it usually defaults to Session default channel group).
- Click the small + icon next to that column header to add a secondary dimension.
- Search for and select Session campaign.
Your table will update to show your traffic broken down by campaign names. You can scroll to the right to see the exact number of Conversions and Total Revenue generated by each individual UTM campaign.
Golden Rules for Tagging WooCommerce Campaigns
Getting clean data requires consistency. If your naming conventions are messy, your analytics reports will be just as chaotic. Keep these rules in mind before you build your first link:
1. Case Sensitivity Matters
Google Analytics treats Email, email, and EMAIL as three completely separate marketing mediums. If you use capitalized words in some links and lowercase in others, your data will split across multiple rows.
The Rule: Force yourself to use lowercase letters for every single UTM parameter.
2. Avoid Spaces in URLs
Browsers do not like spaces. If you write utm_campaign=summer sale, the browser will force an ugly %20 into the middle of the link (summer%20sale).
The Rule: Use underscores (
summer_sale) or dashes (summer-sale) to separate words.
3. Never Use UTMs for Internal Links
A common beginner mistake is putting a UTM link on a homepage hero banner to track how many people click it to go to a product category. Do not do this. When a user clicks an internal link with a UTM parameter, it kills their original session (e.g., tracking that they came from a Google search) and starts a brand new session. This completely breaks your conversion tracking. For internal clicks, rely on standard WordPress heatmaps or e-commerce event tracking instead.
4. Keep a Marketing Ledger
If you have multiple people working on your store, or if you run dozens of promotions a year, you will eventually forget your naming formulas. Create a simple, shared Google Sheet or Excel file to keep a running list of your campaign names, sources, and mediums so your tracking stays uniform month after month.
Next Steps
You do not need to type out long tracking strings by hand. Use a free tool like Google’s Campaign URL Builder. You simply paste your WooCommerce product URL, fill out the form fields for Source, Medium, and Campaign, and the tool generates a perfectly formatted tracking link instantly.
Try generating one tracking link for your next social media post or promotional email, and watch the clear data show up in your analytics dashboard a few hours later.
Want an easy way to track UTM data in WooCommerce?
Get UTM Tracking For WooCommerce and effortlessly track and analyze revenue sources, including organic traffic, Google Ads, Facebook Ads, and more. The plugin also includes UTM link builder for easy and mistake-free link building.
Frequently Asked Questions
What are UTM parameters in WooCommerce?
UTM parameters are short tags you add to the end of a link (for example ?utm_source=newsletter&utm_medium=email&utm_campaign=summer_sale). They don't change where the link goes, but they tell analytics tools exactly which campaign, channel, and source sent a visitor to your WooCommerce store.
What are the five UTM parameters and what do they track?
The five standard UTM parameters are utm_source (the specific platform sending traffic), utm_medium (the broader channel like email or cpc), utm_campaign (the promotion or launch), utm_term (paid-search keywords), and utm_content (distinguishes multiple links within the same campaign).
Do I need a plugin to track UTMs in WooCommerce?
Not for basic traffic tracking—UTM links flow into Google Analytics 4 automatically. The catch is that GA4 reports on sessions rather than orders, and you have to build the reports yourself. To tie every UTM tag to an actual order and see revenue by source and campaign right inside your dashboard, a dedicated plugin like UTM Tracking for WooCommerce is the simplest path.
How can I see which orders came from a specific campaign?
With UTM Tracking for WooCommerce, the UTM parameters of each visitor are saved to their order when they buy. Open any order to see an Order Source panel with the first- and last-touch source, the landing page, and the conversion lag, and use the Source column in the Orders list to scan attribution at a glance. The plugin's reporting screen (under WooCommerce > Marketing > UTM Tracker) also groups sales by source, medium, and campaign so you can compare revenue per channel.
Where do I see UTM campaign data in Google Analytics 4?
In GA4, go to Reports > Acquisition > Traffic acquisition, then click the + next to the primary dimension and add Session campaign. Your traffic will break down by campaign name, where you can compare conversions and total revenue per UTM campaign.
Should I use UTM parameters on internal links within my store?
No. Adding UTMs to internal links ends the visitor's original session and starts a new one, which breaks your attribution and inflates direct or internal traffic. Use UTMs only on external links—emails, ads, and social posts—and rely on heatmaps or e-commerce event tracking for clicks inside your site.
Why is my UTM data split across multiple rows in analytics?
That usually happens because of inconsistent capitalization or spaces. Google Analytics treats Email, email, and EMAIL as different values, and spaces become %20. Always use lowercase and separate words with underscores or dashes, and keep a shared ledger of campaign names so your reporting stays clean.